Old Pictures, Help appreciated

Last weekend i was at my grandmother’s place, helping out the restoration of an old bedroom with my family. Among endless old things we’ve found out a box full of old pictures from my grandfather that i’m now digitalizing for future preservation and to share among our very big family. But while i’m doing this, i’ve encountered something of a “pickle”; most of the pictures have handwritten info on their back, so that we now know who’s who and where it was taken which is great! But how can i store this info?

Please keep in mind, that there are two goals for this:

  • Digitally archive them for future memory and possible usage in a book about my grandfather;

  • Sharing them among our 50+ family which means that Windows, Macs and even Linuxes are in the equation. Also it must be easy to see and relish, now and in the future, so just standard stuff as possible, nothing too “geeky”.

Now, options:

  1. Just write the info on the file name? I have doubts about this. Will the text encoding of the file names in a Mac mess up the readability in Windows or Linux? Haven’t tried but almost sure it will. Also, some pictures have a really long description which will make the filename very long and possibly run into some sort of limitation in Windows, so half of the family will call me asking me for help to fix this. Strong minus.

  2. Tagging them? (Metadata) It seems a bit obscure and not sure if it’s practical to find and search for info. Also, although external programs are not out of consideration i would prefer to keep everything as multi-platform and “strings-free” as possible, so requiring some tag viewer for all platforms is a minus.

  3. Some sort of Html “local” website? Just get some program that receives the pictures, the info and some sort of placement in the hierarchy and outputs a completely standard and simple html site? This seems the best way but what kind of program does this easily?

  4. Just folders of pictures and text files providing the description? A bit rough and not at all practical but it would be standards compliant, easy carriable in the future and portable. But not “pretty” nor easy.

  5. Some other option?

So, please if you have any tip or hint to give me just write it down on the commentaries or drop me a line (( Screen shot 2012 09 14 at 01 25 29 )) (info here or on the footnotes). Appreciated for any help and inside knowledge from those who have done this before!

Thanks!

Change From iCloud As Default Save Location In Text Edit Mountain Lion

There’s a simple Terminal command which will set the default to your local hard drive instead of the cloud, via iCloud. You can still save to iCloud; it just won’t be the first place that shows up when you hit “Save” while in a Text Edit (or other iCloud-enabled app).

To make this happen, launch Terminal from your Utilities folder, which is in the Applications folder. ONce Terminal app launches, type or paste the following command in:

defaults write NSGlobalDomain NSDocumentSaveNewDocumentsToCloud -bool false

Cult of Mac

The most important Defaults Write tip you’ll need in Mountain Lion.

Apple, you’ve tried your point. Can we go back to a regular sane OS now?

Why wont you just die?!

God, i’m so tired of the “sharing buttons” you can find in every website or blog. In fact what i’m more tired is that i notice the delay every time i visit some of my usual blogs (i notice this specially on blogger) that inevitably have my browser status bar saying something like: “Waiting for facebook” or “Waiting for Google Plus”.

Not any more. Just found out this article that says how you can add an Adblock Plus subscription that’s specially focused on eradicating this plague.

If you want to do it and you already use Adblock Plus for Chrome or Firefox (This also works in Adblock for Safari) just go to the Adblock Preferences and add a new subscription providing this link: https://monzta.maltekraus.de/adblock_social.txt . And done. No more privacy risk – time consuming – irritating “social sharing” nuisances. ((Although this doesn’t block all of the links to social networks just the annoying “share this story” kind.))

The power of Keynote

“Many resources/libraries are available (often for free) to make visualization and mock ups even faster (e.g. Keynote KungFu, Keynotopia). Also when you combine this with tools like Glyphish you can have testable solutions quickly rather than getting bogged down in details.”

ESPI at work

(Via Daring Fireball)

I don’t think Pages or Number are serious competition for Microsoft Office or Libre/Open-Office when it comes to complex documents or models, but Apple’s Keynote is a colossus of good presentation software and seriously kicks PowerPoint’s ass.

You should read the full article to understand how Keynote can be used for things you would never think using it, but see also the links on the segment above, there’s a lot of good resources for keynote there if you’re into designing.

The Keychain’s Hidden Powers

“The Keychain can also store secure notes. These are just snippets of text, but because they’re part of your Keychain, they’re safe from prying eyes. To create a secure note, click on the Note icon in the toolbar. Give the note a name; then type your note text or paste it in from another application, such as TextEdit, Microsoft Word, or your e-mail client (see “Don’t Pass This Note”).

A secure-note item works much like a password item: you can see information about the note in the Attributes panel at the bottom of the Keychain Access window. By selecting the Show Note option and providing your account password, you can view the note itself.”

The Keychain’s Hidden Powers | Macworld

Was considering to write a simple tutorial for the use of the Keychain, as many don’t even realize it exists but of course the Macworld has already done such a job.

I love the possibility of writing small notes/pieces of text and keeping it secure and encrypted. I use it many times for storing personal data other than passwords and many times for keeping a “handwritten” backup of the passwords itself.

So, do yourself a favor and go read the quoted article about the keychain. You’ll be surprised with what the keychain can do and what time&life saving features it has.

How to use services in Mac OS X

“One of the little-known time-saving features of Mac OS X is services—hidden, single-feature commands that you can access from a special Services menu, or, sometimes, from a contextual menu. These features are generally provided by applications—built-in OS X applications or third-party programs—and let you quickly preform actions that usually require launching additional programs and taking many steps. Here are answers to frequently asked questions about how to find, use, and manage services.”

Working Mac – Macworld

One of my favourite things in Mac OS X. And if you’re geekish and bold you can even use Automator or an Applescript to define a workflow and set it up as a service, thereby avoiding you wasting your time doing some menial, time-consuming and repetitive tasks.

I strongly recommend that you take some time to read through the Macworld article. And stay tuned as the second part is coming soon.

Quicklook your install packages


One of my biggest complaints and pet-hates are the Install Packages many developers feel they must include. (( I always have the impression they’re just Windows developers that transitioned to the Mac without fully understanding it. ))

The problem is that Install Packages are a security and abuse issue waiting to happen. You are required to go back to the “dark ways” and just mindlessly click “next, next, insert password, next…”


to go through screens of useless information while the installer package can simply be wiping out your home folder and installing a key logger on a system level and you will never even know what it did.

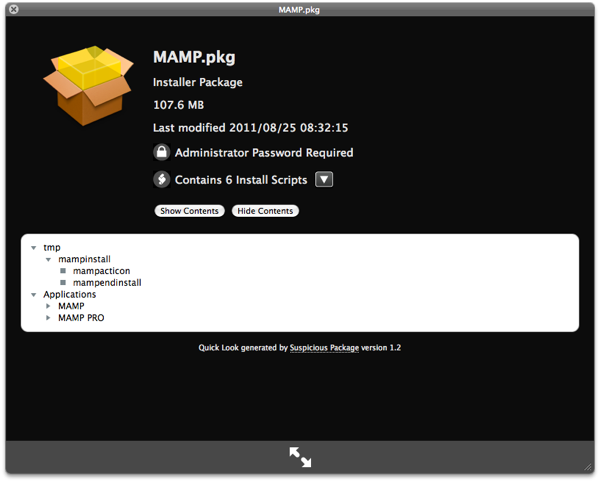
A possible solution to this is a Quicklook plugin called “Suspicious Package“, a very apt name i must add. With it you can simply invoke Quicklook (( through pressing the space bar on finder or right-clicking it and selecting on “Quick Look filename” )) on a Install Package and see what its contents are.

You will now see where the installer will install files, if it haves any install scripts (and you can look through these if you understand them) or if they require an Admin password or a full System Restart to install. All without even executing the file once.


a quicklook on MAMP install package

A QuickLook on the MAMP install package.

The installation of the plugin itself is very simple and you just need to drag the plugin to your Quicklook folder on YourUserFolder/Library/Quicklook . If no such folder exists just create it with the exact name of “Quicklook”.

It should be noted that although Mac OS X is a very secure system, it is no more secure than any other when it comes to the user allowing suspicious applications to run with the elevated privileges of a Administrator. If an application has that privilege, because you gave them to it by typing your admin password, then the app can do as it pleases with your system. So, always go for the paranoid side of things, specially the ones that you are not fully sure of its character. Better safe than sorry…


Create your own Applications Folder

Applications FolderFew “regular” users fully realize this (( specially new “Windows converts” )) but Mac OS apps are just a single contained file that you can run from basically anywhere. This includes your Desktop, a USB disk or any other location of your choosing; but Apple has inserted in your Mac OS a little hidden gem: the User Applications folder.

To use it, you can just create a top level folder on your Home folder, named “Applications”. After you do this, your Mac system will even suit it with the Application folder icon you now see on this post and spotlight will give it a preference on the ordering list of results.

You now have your own Application folder to use. You can simply drag and drop apps into it as you would do with the system level application. And you can drag this folder to the dock and have it appear with the App folder icon.

Some applications might even work better they are on this standard folder than if you just kept it on the desktop or other random spot, although i can’t say this for sure.

The best part of this is that if you are using a shared Mac where you aren’t the admin or simply don’t want to let every other user access your apps, you can simply install them on your User folder and keep them private and non-intruding for your host OS. And if you’re a non-admin user this is pretty much the only way that you can get to install and use applications at will.

And there you go. The shared Mac where everyone gets to have their own System with basically no overlapping regarding ownership of the Applications you use.